

0
Owner's of the Cisco Systems Switch Cisco Nexus Switch gave it a score of 0 out of 5. Here's how the scores stacked up:

Send document comments to nexus7k-docfeedback@cisco.com
5-7
Cisco Nexus 7000 Series Hardware Installation and Reference Guide
OL-18634-01
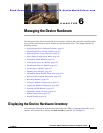
Chapter 5 Connecting the Cisco Nexus 7000 Device to the Network
Connecting an I/O Module
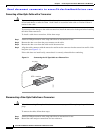
Installing a Transceiver
Note Use only Cisco SFP+ transceivers on the Cisco Nexus 7000 Series 32-port 10-Gigabit Ethernet modules
and use only Cisco SFP transceivers on the Cisco Nexus 7000 Series 48-port 1-Gigabit Ethernet
modules. Each Cisco transceiver is encoded with model information that enables the device to verify that
the transceiver meets the requirements for the device.
To install a transceiver, follow these steps:
Step 1 Attach an ESD-preventative wrist strap and follow its instructions for use.
Step 2 Remove the dust cover from the port cage.
Step 3 Remove the dust cover from the port end of the transceiver.
Step 4 Insert the transceiver into the port.
Caution If the transceiver does not install easily, ensure that it is correctly oriented and the clasp is in the correct
position before continuing.
Note If you cannot install the cable into the transceiver, insert or leave the dust plug in the cable end of the
transceiver.
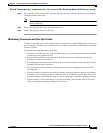
Removing a Transceiver
Caution Removing and installing a transceiver can shorten its useful life. Do not remove and insert transceivers
more often than is absolutely necessary. We recommend that you disconnect cables before installing or
removing transceivers to prevent damage to the cable or transceiver.
To remove a transceiver, follow these steps:
Step 1 Attach an ESD-preventative wrist strap and follow its instructions for use.
Step 2 If a cable is installed in the transceiver, remove the cable as explained in the “Disconnecting a
Fiber-Optic Cable From a Transceiver” section on page 5-8.
Step 3 Remove the transceiver from the port by opening the clasp on the front of the transceiver and pulling the
transceiver out of the port.
Step 4 Insert a dust cover into the port end of the transceiver and place the transceiver on an antistatic mat or
into a static shielding bag if you plan to return it to your Cisco representative.
Step 5 If another transceiver is not being installed, protect the optical cage by inserting a clean cover.


Find Your Products By Category
Please Login
