

0
Owner's of the Cisco Systems Switch Cisco Nexus Switch gave it a score of 0 out of 5. Here's how the scores stacked up:


Send document comments to nexus7k-docfeedback@cisco.com
8-8
Cisco Nexus 7000 Series Hardware Installation and Reference Guide
OL-18634-01
Chapter 8 Removal and Installation Procedures
Replacing an I/O Module
Step 12 On the replacement supervisor module, rotate both of the ejector levers away from the front of the
module.
Caution To prevent ESD damage, avoid touching the electronic circuitry and prevent anything else from coming
in contact with the circuitry.
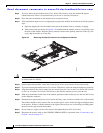
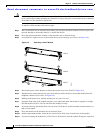
Step 13 If you are inserting the module into a Cisco Nexus 7010 chassis, rotate the module 90 degrees clockwise.
Step 14 Align the module to the chassis guides for the vacated slot (slot 5 or 6 on a Cisco Nexus 7010 chassis or
slot 9 or 10 on a Cisco Nexus 7018 chassis), and slide the module part way into the slot.
Step 15 With one or both hands on the front of the module, push the module all the way into the slot until it seats
on the midplane connector.
Step 16 Slide the module into the slot until it seats on the midplane.
Step 17 Simultaneously push both ejector levers inward until they come in contact with the face of the module.
The module should be fully seated in the slot and the captive screws should be aligned with their holes
in the chassis. If there is another module to the right of the one that you are installing, the EMI gasket
should close the gap between the modules.
Step 18 Screw in the two captive screws to the chassis and tighten them to 69 N m (8 in-lbs).
Step 19 Reconnect the console cable to the CONSOLE SERIAL PORT as explained in the “Connecting to the
Console” section on page 5-2.
Step 20 If the previous supervisor module was connected to an asynchronous device through a modem, connect
the modem cable to the COM1/AUX SERIAL PORT as explained in the
“Connecting to the Console”
section on page 5-2.
Step 21 Reconnect the network management cable to the MGMT ETH port as explained in “Setting Up the
Management Interface” section on page 5-4.
Step 22 Reconnect the CMP cable to the CMP MGMT ETH port as explained in “Connecting the Supervisor
CMP Port” section on page 5-5.
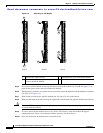
Replacing an I/O Module
The Cisco Nexus 7010 device has up to eight I/O modules, and a Cisco Nexus 7018 has up to 16 I/O
modules. These modules are located on the front of the chassis. You can replace one of these modules at
a time while the device is operating.
For instructions on replacing these I/O modules, see the following sections:
• Required Tools, page 8-8
• Replacing an I/O Module, page 8-9
Required Tools
You need a flat-blade or number 2 Phillips-head screwdriver to loosen or tighten the captive screws on
the I/O module.


Find Your Products By Category
Please Login
