

0
Owner's of the Cisco Systems Switch Cisco Nexus Switch gave it a score of 0 out of 5. Here's how the scores stacked up:


Send document comments to nexus7k-docfeedback@cisco.com
3-4
Cisco Nexus 7000 Series Hardware Installation and Reference Guide
OL-18634-01
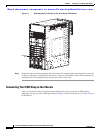
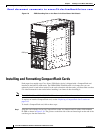
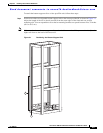
Chapter 3 Installing a Cisco Nexus 7018 Chassis
Installing the Bottom-Support Rails on the Rack
• Required Tools and Equipment, page 3-4
• Attaching the Bottom-Support Rails, page 3-4
Prerequisites for Attaching the Bottom-Support Rails
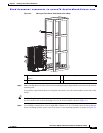
Before you can attach the bottom-support rails, you must fully install the rack or cabinet, and should, for
maximum stability, bolt the rack or cabinet to the concrete subfloor. If anything lighter than the Cisco
Nexus 7018 system is already installed in the rack, you should make sure that it is positioned above
where you will be installing the Nexus 7000 Series system. Also, you must have the bottom-support rail
kit, which ships with the Nexus 7000 Series accessory kit. The distance between the front and rear
mounting brackets on the rack or cabinet must be between 24 and 32 inches (61.0 and 81.3
cm).
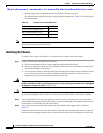
Required Tools and Equipment
You need the following tools and equipment to attach the bottom-support rails:
• No. 1 Phillips screwdriver.
• Rack-mount kit (shipped with the accessory kit). Table 3-1 lists the items in the rack-mount kit.
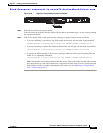
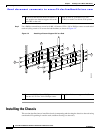
Attaching the Bottom-Support Rails
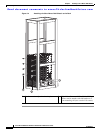
To maximize the stability of the rack, you should install the chassis as low as possible on the rack. Install
the first system at the bottom of the rack. If you install a second system in the same rack, install it
immediately above the lower system if there is enough vertical space. If you are planning to install
another system in the rack, make sure that the heaviest system is installed first at the bottom of the rack.
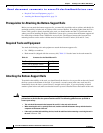
Table 3-1 Contents for the Rack-Mount Kit
Part Description Quantity
12-24 x 3/4 in. Phillips screws 40
M6 x 19 mm Phillips screws 40
Adjustable bottom-support rails 2
Warning
To prevent bodily injury when mounting or servicing this unit in a rack, you must take special
precautions to ensure that the system remains stable. The following guidelines are provided to
ensure your safety:
• This unit should be mounted at the bottom of the rack if it is the only unit in the rack.
• When mounting this unit in a partially filled rack, load the rack from the bottom to the top with the heaviest
component at the bottom of the rack.
• If the rack is provided with stabilizing devices, install the stabilizers before mounting or servicing the unit in
the rack.
Statement 1006


Find Your Products By Category
Please Login
