
0
Owner's of the Cisco Systems Switch Cisco Nexus Switch gave it a score of 0 out of 5. Here's how the scores stacked up:

Send document comments to nexus7k-docfeedback@cisco.com
8-21
Cisco Nexus 7000 Series Hardware Installation and Reference Guide
OL-18634-01
Chapter 8 Removal and Installation Procedures
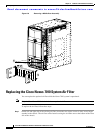
Replacing the Cisco Nexus 7010 System Air Filter
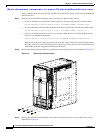
Step 2 With one hand holding the air filter in place, use the other hand to pull out the spring pin on one side of
the air filter. Pull that side of the air filter away from the chassis and release the spring pin when it is
clear of the bracket on the EMI frame.
Step 3 Switch the hands holding the air filter and use the other hand to pull out the spring pin on the other side
of the air filter. Pull the air filter away from the chassis and release the spring pin.
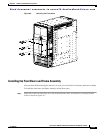
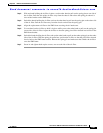
Step 4 Align the replacement air filter to the EMI frame covering the air intake area.
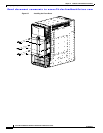
Step 5 Use one hand on the air filter to hold it in place while you use the other hand to pull out the spring pin
on one side of the air filter. Adjust the air filter so that the spring pin will be released into its hole in the
EMI frame bracket.
Step 6 Switch the hands holding the air filter and use the other hand to pull out the other spring pin on the other
side of the air filter. With the spring pin pulled out, position the air filter so that the pin will be released
into its hole on the EMI frame bracket. Release the spring pin and make sure that it holds the air filter
on to the EMI frame.
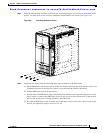
Step 7 Screw in and tighten both captive screws, one on each side of the air filter.


Find Your Products By Category
Please Login
