

0
Owner's of the Cisco Systems Switch Cisco Nexus Switch gave it a score of 0 out of 5. Here's how the scores stacked up:


Send document comments to nexus7k-docfeedback@cisco.com
3-8
Cisco Nexus 7000 Series Hardware Installation and Reference Guide
OL-18634-01
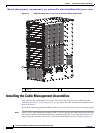
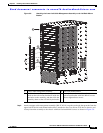
Chapter 3 Installing a Cisco Nexus 7018 Chassis
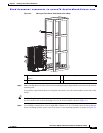
Installing the Chassis
• Bottom-support rails kit (shipped with the Cisco Nexus 7018 accessory kit)
Part of this kit has already been used to install the bottom-support rails. Table 3-2 lists the items in
the rack-mount kit.
Note You should also have at least four people to push the chassis, which can weigh up to 700 lbs (318 kg),
onto and off the mechanical lift and rack.
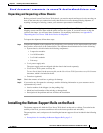
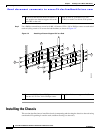
Installing the Chassis
To install a Cisco Nexus 7018 chassis in a four-post rack or cabinet, follow these steps:
Step 1 Load the chassis onto a mechanical lift as follows:
a. Position the mechanical lift next to the shipping pallet that holds the chassis.
b. Elevate the lift platform to the level of the bottom of the chassis (or no more than 1/4 inch [0.635
cm] below the bottom of the chassis).
c. Use at least four persons to slide the chassis fully onto the lift so that the side of the chassis touches
or is close to the vertical rails on the lift. Make sure that the front and rear of the chassis are
unobstructed so you can easily push the chassis into the rack.
Warning
To prevent personal injury or damage to the chassis, never attempt to lift or tilt the chassis using the
handles on modules (such as power supplies, fans, or cards); these types of handles are not designed
to support the weight of the unit.
Statement 1032
Caution To lift the chassis, use a mechanical lift, not the handles on the side of the chassis. Use the side handles
for only repositioning the chassis after it is already on the mechanical lift or in the rack or cabinet.
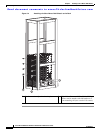
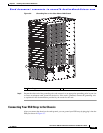
Step 2 Use the mechanical lift to move and align the rear of the chassis to the front of the four-post rack or
cabinet. Make sure that the bottom of the chassis is elevated to the height of the bottom-support rails or
no more than 1/4 inch (0.635 cm) above the bracket.
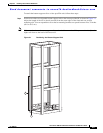
Step 3 Use at least four persons to push the chassis onto the installed bottom-support rails as shown in
Figure 3-3.
Push the lower half of the front side of the chassis so that the back side enters the rack first, and push
until the chassis mounting brackets come in contact with the front vertical mounting rails on the rack.
Table 3-2 Contents for the Rack-Mount Kit
Part Description Quantity
12-24 x 3/4 in. Phillips screws 40
M6 x 19 mm Phillips screws 40
Adjustable bottom-support rails 2


Find Your Products By Category
Please Login
