

0
Owner's of the Cisco Systems Switch Cisco Nexus Switch gave it a score of 0 out of 5. Here's how the scores stacked up:

Send document comments to nexus7k-docfeedback@cisco.com
2-5
Cisco Nexus 7000 Series Hardware Installation and Reference Guide
OL-18634-01
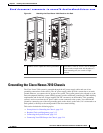
Chapter 2 Installing a Cisco Nexus 7010 Chassis
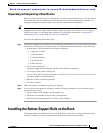
Installing the Bottom-Support Rails on the Rack
To attach the bottom-support rails to a four-post EIA rack, follow these steps:
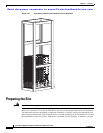
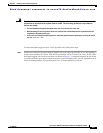
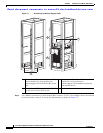
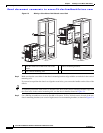
Step 1 Position one of the two adjustable bottom-support rails at the lowest possible RU. If you are installing a
chassis above another Cisco Nexus 7010 chassis, position the rail 36.75
inches (93.4 cm) (21 RU) above
the bottom-support rails for the lower chassis as shown in
Figure 2-1. Adjust the length of the rail so that
it stretches from the outer edges of the front and rear vertical mounting rails. You can expand the rail so
that its mounting brackets are spaced between 24 to 32
inches (60.96 to 81.28 cm).
Warning
To prevent bodily injury when mounting or servicing this unit in a rack, you must take special
precautions to ensure that the system remains stable. The following guidelines are provided to
ensure your safety:
• This unit should be mounted at the bottom of the rack if it is the only unit in the rack.
• When mounting this unit in a partially filled rack, load the rack from the bottom to the top with the heaviest
component at the bottom of the rack.
• If the rack is provided with stabilizing devices, install the stabilizers before mounting or servicing the unit in
the rack.
Statement 1006


Find Your Products By Category
Please Login
