

0
Owner's of the Cisco Systems Switch Cisco Nexus Switch gave it a score of 0 out of 5. Here's how the scores stacked up:


Send document comments to nexus7k-docfeedback@cisco.com
8-7
Cisco Nexus 7000 Series Hardware Installation and Reference Guide
OL-18634-01
Chapter 8 Removal and Installation Procedures
Replacing a Supervisor Module
Step 19 If the previous supervisor module was connected to an asynchronous device through a modem, connect
the modem cable to the COM1/AUX SERIAL PORT as explained in the
“Connecting to the Console”
section on page 5-2.
Step 20 Reconnect the network management cable to the MGMT ETH port as explained in “Setting Up the
Management Interface” section on page 5-4.
Step 21 Reconnect the CMP cable to the CMP MGMT ETH port as explained in “Connecting the Supervisor
CMP Port” section on page 5-5.
Replacing a Supervisor Module in a Single-Supervisor System
If you need to replace the supervisor in a single-supervisor Cisco Nexus 7000 Series system, you must
shut down the system before replacing the supervisor.
Warning
Hazardous voltage or energy is present on the backplane when the system is operating. Use caution
when servicing. Statement 1034
Caution Handle the supervisor module carefully using an ESD wrist strap, holding the module only on its carrier
edges without touching any electronic circuitry, and placing the module on antistatic mats or antistatic
foam when it is not installed in the Cisco Nexus 7000 Series chassis.
To replace a supervisor module in a single-supervisor system, do the following:
Step 1 Place an antistatic mat or antistatic foam where you can place the new and old supervisor modules.
Step 2 Place the replacement supervisor module on the antistatic mat or antistatic foam.
Step 3 Turn off the power on each of the power supply unit by turning its power switch to standby (STBY).
Step 4 Disconnect all of the cables attached to the front of the module to be removed.
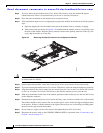
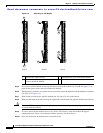
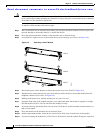
Step 5 Loosen the two captive screws identified in View A of Figure 8-1.
Step 6 Press the ejector release buttons on the top and bottom ends of the module (see View B of Figure 8-1) to
push out the ejector levers and to disconnect the module.
Step 7 Simultaneously rotate the two ejector levers outward to unseat the module from the midplane connector
(see View C of
Figure 8-1.
Step 8 With a hand on each ejector, pull the module part way out of its slot in the chassis.
Step 9 Grasp the front edge of the module with your left hand and place your right hand under the lower side
of the module to support its weight. Pull the module out of its slot.
Caution To prevent ESD damage, avoid touching the electronic circuitry and prevent anything else from coming
in contact with the circuitry.
Step 10 If you are removing a module from a Cisco Nexus 7010 chassis, rotate the module 90 degrees
counterclockwise so that it is horizontal and you can see its circuitry from above.
Step 11 Place the removed module on the antistatic mat or antistatic foam.


Find Your Products By Category
Please Login
