

0
Owner's of the Cisco Systems Switch Cisco Nexus Switch gave it a score of 0 out of 5. Here's how the scores stacked up:


Send document comments to nexus7k-docfeedback@cisco.com
8-3
Cisco Nexus 7000 Series Hardware Installation and Reference Guide
OL-18634-01
Chapter 8 Removal and Installation Procedures
Replacing a Power Supply Unit During Operations
Warning
Hazardous voltage or energy is present on the backplane when the system is operating. Use caution
when servicing.
Statement 1034
To install a power supply unit while a Cisco Nexus 7000 Series device is operating, follow these steps:
Step 1 Ensure that the power switch on the power supply unit is in the standby (STBY) position and that the AC
power cords are not plugged into the AC power supply.
Step 2 If the power cords are not already attached to the power supply unit, plug the power cables into the power
jacks on the front of the power supply unit and tighten the cable retention devices for each cable.
Depending on the amount of power consumed by the power supply unit, you need to attach one or two
power cords.
Note The 6-kW power supply unit does not ship with power cables attached to it, so you must attach one or
two of those cables. If necessary, you can remove the cables from the power supply unit that you
removed. The 7.5-kW power supply ships with permanently attached power cables, so you do not need
to attach power cables to that power supply unit.
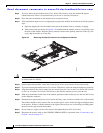
Step 3 Grasp the power supply unit handle with one hand, and place your other hand underneath the power
supply unit to support its weight. Align the back of the power supply unit with the power supply bay and
slide the power supply into the power supply bay. Make sure the power supply unit is fully seated in the
power supply bay and that its four captive screws are aligned with their holes in the chassis.
Note The 6-kW power supply unit weighs 22 pounds (10 kg), and the 7.5-kW power supply unit weighs 26.4
pounds (12 kg). Use two hands to safely hold and move a power supply unit.
Step 4 Screw in and tighten the four captive screws so the power supply unit is secured to the device chassis.
Step 5 Plug the power cables that are already attached to the power supply unit into the AC power source.
Tip For power redundancy, plug each power cable into a separate AC power supply circuit.
Step 6 Turn the Power switch from STBY to ON.
Step 7 Verify the power supply operation by checking that the power supply LEDs are in the following states:
• Input 1 LED is green.
• If a second AC power cord was connected, the Input 2 LED is green.
• Output LED is green.
• Fault LED is not on or blinking.
If one or more of these LEDs is red, turn the power switch to standby (STBY), check the AC power
connections for the line in standby (STDBY), and then turn the power switch back to ON. The LEDs for
the connected power supply units should be green.
For more information on the power supply unit LED states, see Table C-5 on page C-5.


Find Your Products By Category
Please Login
