

0
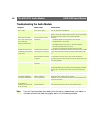
Owner's of the Axis Communications Security Camera 2420 W/Lens gave it a score of 0 out of 5. Here's how the scores stacked up:


AXIS 2420 User’s Manual Choosing Your Application
37
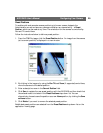
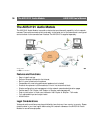
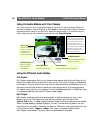
Viewing live Images in a Browser
This application represents the most basic application using a network camera. It is ideally
suited for occasionally-visited sites on both large corporate networks, and SOHO
(Small-Office Home-Office) applications, where a small network is installed and
maintained. If you anticipate a large audience for your images, you should consider
configuring your product to upload images to an FTP server/ISP, as described in
Sequentially Uploading Images to an FTP Server/ISP, on page 35.
Simply install the AXIS 2420 directly onto your local Ethernet network and then run the
Installation Wizard to immediately view live video images in your browser. The Wizard
helps you define the image format, network and security settings.
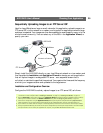
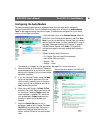
Installation and Configuration Overview
Configure your AXIS 2420 for viewing images over a network as follows:
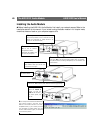
1. Connect the AXIS 2420 to your local network. Refer to Installing on a Network, on page 12.
2. Open the Home Page in your browser and start the Installation Wizard. Complete the Wizard to establish the basic settings
for your camera - selecting Network as your chosen method of connection in the Modem or Network dialog. Refer to
Configuring Your Camera, on page 18.
3. Your application is now complete. Having completed the Wizard, you should now check the installation by checking that you
have full access to both the images and the Web pages in your browser.
AXIS 2420
LAN/WAN
Intranet or Internet
Browser
Browser


Find Your Products By Category
Please Login
