
0
Owner's of the Axis Communications Security Camera 2420 W/Lens gave it a score of 0 out of 5. Here's how the scores stacked up:
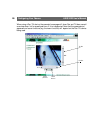


Choosing Your Application AXIS 2420 User’s Manual
36
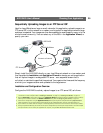
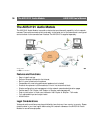
Uploading Pre and/or Post Alarm Images to an FTP server/ISP
The AXIS 2420 is the ideal solution for a wide variety of surveillance and process control
applications. By connecting your external alarm devices to the I/O connector (see
Appendix F - The Unit Connectors), you can quickly configure the product to upload single
images, or send pre/post alarm image sequences to an FTP server or ISP when an event
occurs. The images can be transmitted over an Ethernet network or via a modem
connection.
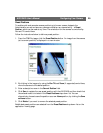
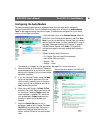
Using the Wizards, you can organize the times and frequency at which images are taken
and uploaded to the target FTP server/ISP. There are also options for sending e-mail alerts
containing images and/or a link to the camera.
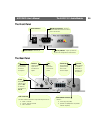
Installation and Configuration Overview
Configure the AXIS 2420 to upload Pre and/or Post Alarm images, as follows:
Notes: •Modem connections - except for when the AXIS 2420 is dialing-out, you can change the prod-
uct´s configuration at any time using the modem connection, or a local computer connected via
the supplied null modem cable.
•If you also have an Ethernet network connection to the camera, then this can always be used to
access the camera - even if it is dialing out via the modem connection.
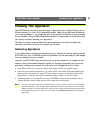
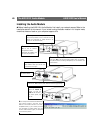
1. Connect the AXIS 2420 to your local network, or, if no network is available, use the null modem cable to create a direct
connection to a local computer. Refer to Installing on a Network, on page 12, or Installing via a Modem, on page 14.
2. Open the Home Page in your browser and start the Installation Wizard. Complete the Wizard to establish the basic settings -
selecting the connection method in the Modem or Network dialog. Refer to Configuring Your Camera, on page 18.
3. Continue the configuration using the Application Wizard, defining the target FTP server/ISP and setting Alarm as the mode of
operation. You will also be able to make settings for the upload destination, alarm conditions, etc.
4. If you used the null modem cable to configure a modem application, disconnect it and connect the camera to your modem.
5. Having completed the Wizard, you should now verify the configuration by triggering an alarm and then, in your browser,
viewing the images sent to the FTP sever/ISP. You can refine your application at any time, using the Web-based
Administration Tools


Find Your Products By Category
Please Login
