
0
Owner's of the Whirlpool Clothes Dryer 4LEC7646EN0 gave it a score of 0 out of 5. Here's how the scores stacked up:
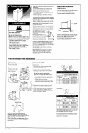

Slide dryer onto cardboard or hardboard
n
Move dryer close to its permanent
exhaust vent. Remove cardboard or
hardboard from under dryer.
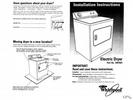
w Connect exhaust vent to exhaust outlet
in dryer. The exhaust vent must fit over the
dryer exhaust outlet and inside the exhaust
hood vent.
Use duct tape to seal all joints and to secure
exhaust vent to dryer exhaust outlet.
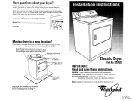
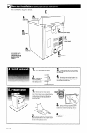
w Check levelness of dryer by placing a
level on top of dryer, first side to side, then
front to back. If dryer is not level, adjust
dryer legs up or down.
H Move dryer into final position.
3
n
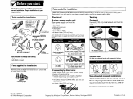
If legs are not long enough to level
dryer, order Extended Dryer Feet Kit,
Part No. 279810 (sold two legs per kit),
from your dealer.
n
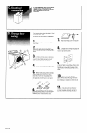
Plug power supply cord into grounded
outlet or connect direct wire to power supply.
Turn power supply on.
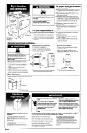
I Read the Use and Care Guide to fully
understand your new dryer. Select a full heat
cycle (not the air cycle) and start dryer. After five
minutes, open dryer door. You should feel heat
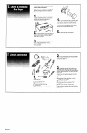
If dryer does not operate properly, check the
(/ electrical supply is connected.
Check that you:
/ did not skip any steps.
4 installed all parts.
(/ properly installed dryer legs.
(/ leveled dryer.
4 have all the tools you started with.
/ house fuse is intact and tight; or circuit
breaker has not tripped.
d dryer door is closed.
ti controls are set in a running or “On”
position.
/ start button has been pushed firmly.
If dryer makes an unusual noise, check that the
dryer is level.
Panel E


Find Your Products By Category
Please Login
