
0
Owner's of the Whirlpool Clothes Dryer 4LEC7646EN0 gave it a score of 0 out of 5. Here's how the scores stacked up:
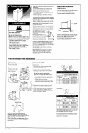

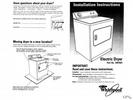
AND CONFORM WITH THE LOCAL
STANDARDS.
Be careful not to scratch or chip paint.
2
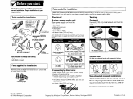
w Open dryer door. Remove bottom
screws from cabinet side of hinges (B). Loosen
(do not remove) top screws from cabinet side of
hinges.
8
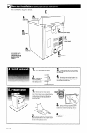
I Carefully remove 4 hinge hole plugs (C)
on left side of cabinet. Insert plugs in hinge
holes on right side of cabinet.
3
I Lift door until top screws in cabinet are
in large part of hinge slot. Pull door forward off
screws. Set door (handle side up) on top of
dryer. Remove top screws from cabinet.
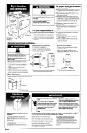
4
n
Remove screws attaching hinges to door.
5
l
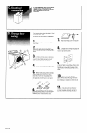
Remove screws at top, bottom and side
of door. Holding door over towel on dryer,
grasp sides of outer door and carefully lift to
separate it from inner door. Do NOT pry apart
with putty knife. Do NOT pull on door seal or
plastic door catches.
.-
~,~,__.__......... . . . ..- . . . . . ..______~~~~~~_
9
n
Insert screws i; bottom holes on left side
of cabinet. Tighten screws halfway. Position door
so large end of door hinge slot is over screws.
Slide door up so screws are in bottom of slots.
Tighten screws. Insert and tighten top screws in
hinges.
10
n
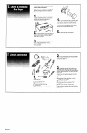
Remove door strike (D) from
cabinet. Remove door strike plug. Insert door
strike in new hole and secure with screw. Insert
door strike plug in original door strike hole and
secure with screw.
6
m Turn and reattach outer door panel to
inner door panel so handle is on the side where
hinges were just removed. Be careful to keep
cardboard spacer centered between doors.
11
w Close door and check that door
strike aligns with door catch (E). If door does
not close completely, slide door catch left or
right within slot until strike snaps into catch.
Panel D


Find Your Products By Category
Please Login
