

0
Owner's of the Atlantis Land Security Camera IP Security Cam gave it a score of 0 out of 5. Here's how the scores stacked up:


IP Security Cam
21
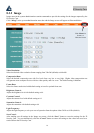
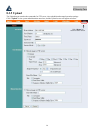
There are three options to proceed in the Upload screen, including FTP Server, Time Schedule and Manual
Operation.
FTP Server:
There are six basic settings for your FTP server.
• Host Address: The IP Address of the target FTP server.
• Port Number: The standard port number for the FTP server is Port 21, and it’s also the default setting. If
the FTP server uses a specific port, please confirm the IT manager.
• User Name: Enter the user name in this field.
• Password: Enter the user password in this field to login the FTP server.
• Directory Path: Enter an existing folder name in this field, and the images will be uploaded to the given
folder.
• Passive Mode: This function depends on your FTP server. Please check with your IT manager if the FTP
server uses passive mode. The default setting is ‘No’.
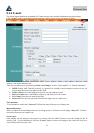
Time Schedule:
Select “Upload image to FTP server” and enter the relevant information, such as the schedule, image frequency
and base file name.
• Schedule: You can 1.) Choose Always to always upload the images to FTP server, or 2.) Set the Schedule
to manage the uploading task. In the Schedule option, you can set the Day and Time Period option.
• Image Frequency: There are two ways to set the image frequency: 1.) Set Auto/1/2/3 frames per second,
or 2.) Set the time in seconds for every frame.
• Base File Name: Enter the file name to make sure that the images could be saved as the base file name.
• File: Since you may not upload only one image to the FTP server, you can choose the filing rule, including
Overwrite, Date/Time Suffix, and set up the Sequence Number.
Manual Operation: When you click the upload “Image” button in view image screen, it will start to upload the
image. The setting refers to “Base File Name” and “File” information above.
Save/Cancel:
After making sure all settings in the System are correct, click the “Save” button to store the settings for the IP
Security Cam. You can alternatively click the “Cancel” button to restore all settings to the latest saved values or
retrieve the settings from IP Security Cam.


Find Your Products By Category
Please Login
