

0
Owner's of the Klipsch Speaker ULTRA2 gave it a score of 0 out of 5. Here's how the scores stacked up:


The KS-7800-THX should be installed to either side of the
listening position at an equal distance from the listener whenever
possible. You may also install them behind the listening position
and achieve good results.
THX Ultra2 7.1 surround systems utilize a surround back channel
in addition to the traditional side surrounds. When configuring
such a system it is suggested to use KL-7800 speakers in the
surround back location.
Speaker Installation (for New Construction, skip to step #3)
1. Cut the appropriate size opening in the wall using the tem-
plate provided. If the template is not available, cutout dimensions
are provided on the Klipsch website, at www.klipsch.com. Sizes
listed are minimum. If accuracy of cut cannot be achieved, you
may add 1/4" to each dimension. Be careful not to cut through
any existing wiring or plumbing. Avoid compromising any fire
stops between studs.
2. Run speaker wiring (18 gauge minimum) to the openings. Be
sure to comply with all building codes in your area.
3. Attach the wire to the speaker using the wire’s color coding or
markings as a guide to maintain proper polarity.
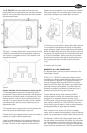
4.Insert the speaker assembly into the opening and attach by
tightening the six Phillips screws (see illustration). The frame’s
six “dogs” will swivel out and “sandwich” the wall and frame
together as they are tightened. If you use a power tool to tighten
these screws, please use a low torque setting. Failure to do so
could result in damage to your speaker (Refer to Figure 3)
5. At this point, you may paint the speaker grille before attaching
it to the speaker. Klipsch speakers and grilles are designed to
accept most types of paint. Use the supplied clear paint shield to
protect the speaker baffle and drivers when painting the bezel of
the speaker. Care should be taken to avoid excessive paint build-
up in the grille perforations. Please remove the scrim material
attached to inner surface of the grille by carefully peeling it out
prior to painting. Reinstall scrim after the paint on the grille
is dry.
6. Press the grille into place.
WARRANTY—U.S. AND CANADA ONLY
The Warranty below is valid only for sales to consumers in the
United States or Canada.
KLIPSCH, L.L.C. ("KLIPSCH") warrants this product to be free
from defects in materials and workmanship (subject to the terms
set forth below) for a period of five (5) years from the date of
purchase. During the Warranty period, KLIPSCH will repair or
replace (at KLIPSCH’s option) this product or any defective parts
(excluding electronics and amplifiers). For products that have
electronics or amplifiers, the Warranty on those parts is for a
period of two (2) years from the date of purchase.
To obtain Warranty service, please contact the KLIPSCH
authorized dealer from which you purchased this product. If
your dealer is not equipped to perform the repair of your
KLIPSCH product, it can be returned, freight paid, to KLIPSCH for
repair. Please call KLIPSCH at 1-800-KLIPSCH for instructions.
You will need to ship this product in either its original packaging
or packaging affording an equal degree of protection.
Proof of purchase in the form of a bill of sale or receipted
invoice, which is evidence that this product is within the Warranty
period, must be presented or included to obtain Warranty service.
This Warranty is invalid if (a) the factory-applied serial number
has been altered or removed from this product or (b) this product
was not purchased from a KLIPSCH authorized dealer. You may
call 1-800-KLIPSCH to confirm that you have an unaltered serial
number and/or you purchased from a KLIPSCH authorized dealer.
Figure 1
Figure 2


Find Your Products By Category
Please Login
