
0
Owner's of the 321 Studios Coffeemaker Digital to Analogue Converter gave it a score of 0 out of 5. Here's how the scores stacked up:


E-5
English
installation
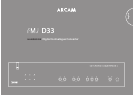
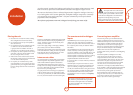
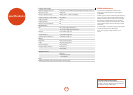
Arcam’s D33 DAC provides class-leading sound quality from computer USB connections, AES/
EBU connections, optical and coaxial S/PDIF connections and supported Apple® devices.
e D33 uses dual state-of-the-art Advanced Segment DAC (Digital-to-Analogue Converter)
ICs, which together with a custom digital lter, audiophile analogue components, a massively-
over-engineered power supply and JetPLL™ clock jitter elimination provide unprecedented
performance and sound quality.
e reference performance D33 DAC is designed to truly bring your music to life.
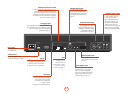
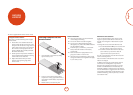
Power
e DAC is supplied with a moulded mains plug already
tted to the lead. Check that the plug supplied ts your
supply – should you require a new mains lead, please
contact your Arcam dealer.
If your mains supply voltage or mains plug is dierent,
please contact your Arcam dealer immediately
Push the IEC plug end of the power cable into the socket
on the back of the DAC, making sure that it is pushed in
rmly. Plug the other end of the cable into your mains
socket and, if necessary, switch the socket on.
Interconnect cables
We recommend the use of high-quality screened cables
that are designed for the particular application. Other
cables will have dierent impedance characteristics
that will degrade the performance of your system (for
example, do not use cabling intended for analogue audio
use to carry digital audio signals). All cables should be
kept as short as is practically possible.
It is good practice when connecting your equipment to
make sure that the mains power-supply cabling is kept
as far away as possible from your audio cables. Failure to
do so may result in unwanted noise in the audio signals.
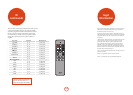
The remote control and trigger
inputs
e REMOTE IN input can be used to pass RC5 codes
(listed on page E-10) to the D33 if it is installed in a
position, or a system, where infrared cannot be used. If
this is required, please contact your dealer for further
information.
e
12V TRIG IN input can be used to switch the D33 in
and out of stand-by. Connecting the trigger output of
your Arcam amplier (or other compatible device), will
cause the D33 to come out of stand-by automatically
when the amplier is switched on, returning to stand-by
when the amplier is switched o. Please see your
amplier handbook for further information.
In normal use there is no need to make any connections
to these inputs.
e
RS232 input is for optional connection to a home
automation system or a computer. Various third-party
sytems are available providing sophisticated control
over all your entertainment devices using touch screens
etc. Contact your dealer or installer for further details.
e technical details of the remote control protocol
are available from Arcam on request (email support@
arcam.co.uk).
e remote control input requires a mono 3.5mm
jack, with the tip active and the sleeve grounded.
e remote control signals must be in modulated
RC5 format (at 36kHz), with a voltage level of
between 5V and 12V.
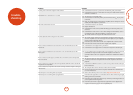
Connecting to an amplifier
e D33 DAC provides a pair of unbalanced audio
outputs on standard RCA phono connectors and a set
of balanced audio outputs on male XLR connectors. All
audio outputs are available simultaneously, allowing
multiple devices to receive the D33’s output signal.
However, to maintain the cleanest possible signal path
the pair of unbalanced outputs is not individually
buered. is means that if two ampliers are
connected, both must be powered on to avoid degrading
the signal.
Most audio ampliers, including the Arcam FMJ
range, will connect to the RCA phono connectors
using standard interconnect cables. is connection
is recommended for short cable runs. e D33 output
behaves like a CD player and operates at line level.
Connect to any line level input such as those marked
‘CD’, ‘AUX’, ‘AV’ etc. Do not connect to any input
intended for a record player (usually labelled ‘Phono’).
If your amplier or other replay equipment has balanced
connections, you may use the balanced XLR output.
is connection provides greater rejection from
electrical interference and is useful when cables are
long (more than a few metres) or in electrically-noisy
environments. Balanced connections also have the
ability to reject ‘hum’ caused by ‘ground loops’.
WARNING!
e output of the D33 is at line level. Do
not connect directly to a power amplier
or active speaker system without a volume control,
as this will cause all playback to be at full volume.
Equipment or hearing damage may result.
Always connect the D33 to an integrated amplier,
preamplier or other device with a volume control.
Placing the unit
< Place the DAC on a level, rm surface, avoiding
direct sunlight and sources of heat or damp.
< Do not place the DAC on top of an amplier or
other source of heat.
< Do not place the DAC in an enclosed space such
as a bookcase or closed cabinet unless there
is good provision for ventilation. e DAC is
designed to run warm during normal operation.
< Do not place any other component or item on top
of the DAC as this may obstruct airow around
the unit, causing the DAC to run hot.
< Make sure the remote-control receiver (behind
the FMJ logo on the front panel) is unobstructed,
or remote control will be impaired.
< Do not place your record deck on top of this
unit. Record decks are very sensitive to the noise
generated by mains power supplies which will be
heard as a background ‘hum’ if the record deck is
too close.


Find Your Products By Category
Please Login
