

0
Owner's of the Rancilio Coffeemaker RockySS gave it a score of 0 out of 5. Here's how the scores stacked up:

35
8.2. Coffee preparation
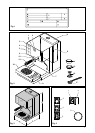
Detach the portafilter (13) from its slot by turning it
in a clockwise direction and pulling in a downward
motion.
Using the measurement scoop (17) supplied, fill
the filter with either one or two measurements of
coffee according to the inserted filter (14/15).
Press the coffee using tamper (16).
Re-connect and tighten the portafilter (13) in its slot
by turning it in a counter-clockwise direction.
Position your espresso cup(s) under the exit outlets
of the portafilter (13).
Press the coffee delivery switch (3); delivery will
begin after a few seconds. On obtaining the requi-
red amount turn off switch (3).
Check frequently the water level in tank (8) in
order to avoid causing the pump to pull in air
during coffee delivery (which is noisy). If this
should happen, immediately switch off the
coffee delivery switch (3), fill the water tank
and repeat the “starting up” operations.
It is recommended to pay attention to the hot
parts of the machine, especially the delivery
group and the steam outlet steam wand.
Never put your hands under the group or
under the steam outlet while the machine
is working.
Silvia is designed for installation of our
coffee pod kit. For further information,
please contact your dealer accordingly.
8.3. Steam delivery
Press the steam switch (5), wait a few seconds
and then open the steam tap (6) to allow any
condensed water to be expelled from the steam
wand (7). Close the tap (6) again.
Wait about 30 seconds, then immerse the steam
wand (7) in the liquid to be heated. Open the steam
tap (6), the steam will come out and heat the liquid
to the desired temperature.
Never deliver steam longer than 4-5 minutes
without filling the boiler water
Once the heating of the liquid is complete, dischar-
ge a little steam to clean out the sprayer hole in
steam wand (7).
Turn off the steam switch (5 )and clean the steam
wand (7) with a damp cloth.
Fill up the water in the tank (see relative paragraph
8.6)
8.4. To steam milk
Fill a steam pitcher approximately half-full with milk
Immerse about half of the steam wand (7) in the
liquid, open steam tap (6) and heat the milk to the
desired temperature.
Close steam tap (6), remove steam wand (7) from
container.
Restore the water level in the boiler (see relative
paragraph 8.6).
8.5. Hot water delivery
Position a container under the steam wand (7).
Open the steam tap (6) and discharge any steam
present in the boiler.
Press water delivery switch (4) and take the ne-
cessary amount of water.
Close steam tap (6) and turn off water delivery
switch (4) .
8.6. Refilling water in the boiler
Check that switches (4) and (5) are off and that
the portafilter (13) is disconnected;
Press coffee delivery switch (3) and wait for the
water to come out of group head (12)
Turn off coffee delivery switch (3).
In the event of a dangerous situation immediately
turn off all the switches including main power and
unplug the machine from the power source.
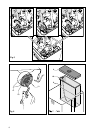
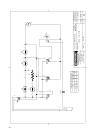
8.7. Pump pressure adjustment (Fig.5)
Warning! This operation must strictly be
conducted only by qualified technical per-
sonnel.
To adjust the water pump pressure, unplug the machi-
ne so that it powers down completely. Wait until it has
completely cooled down, then remove the top cover
element by screwing out the relative lock screws.
Once machine is open, proceed as follows:
1 Loosen the lock nut.
2 Act on the flexible hose connector fitting as illustra-
ted i.e. screw it in to increase pressure or screw it
out to decrease pressure. Take care to screw the
connector fitting either in or out by maximum one
turn.
3 Once the adjustment operation is complete, screw
the lock nut back on again to close the connecting
nozzle into position. Place the top cover element
back on and lock the relative screws back in
again.
POD
ADAPTABLE


Find Your Products By Category
Please Login
