
0
Owner's of the La Pavoni Coffee Grinder PA-JVD gave it a score of 0 out of 5. Here's how the scores stacked up:

32 33
English
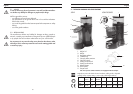
8.2 – JOLLY DOSATO MODEL
- Place the filter basket inside the filter-holder and together in the fork pro-
vided (7) into the dosing grinder (the device is equipped of one reducer
(10) to put into the fork (7) to fit to the dimensions of the filter-holder).
- Pull slowly the lever (8) of the dosing device as much as possible, to
allow delivery into the filter basket of the amount of ground coffee set
for one cup of espresso coffee.
Repeat the operation if you are preparing two cups of coffee.
9 – CLEANING OPERATIONS
Clean it after each use and sometimes carry out a more accurate cleaning
procedure on the bell jar (2) and on the ground coffee container (4), to
remove any oily substances.
Before conducting any kind of cleaning operation, unplug the electric
cable from the power socket..
9.1 – CASING CLEANING
To clean the grinder casing from coffee powder and dirt, use a damp cloth,
non abrasive cloth, without alcohol or solvents, to avoid damaging the
plastic, painted or treated parts.
9.2 – BELL JAR CLEANING
After having emptied the bell jar (2) from any coffee beans, remove it from
the body of the grinder by pulling it upwards; clean the inside with soapy
water, dry carefully and fit it back on the grinder.
For safety reasons, we recommend not to use the grinder without the
bell jar
9.3 – GROUND COFFEE CONTAINER CLEANING
Jolly Model
Remove the ground coffee container (5) from the body of the grinder, pulling
it upwards until it comes off from the container fastening screw; after having
removed any ground coffee powder, wash the inside with soapy water to
remove any coffee residues and oily substances, dry carefully and put the
container back in its place, insuring that it fits into the fastening screw.
English
5 – ELECTRIC CONNECTION
Warning! Before making the electric connection, make sure that the main
power voltage corresponds to the specifications indicated on the data
plate placed under the base of the grinder.
6 – STARTING THE GRINDER
- Insert the plug of the electric cable in the power socket..
- Remove the lid (1) of the bell jar and fill the bell jar (2) with coffee
beans.
- Place the switch (6) on the I position; the internal warning light shows
that the grinder is on, at the same time, grinding will start; once the
desired amount of coffee has been ground, place the switch on the O
position to stop the grinding process.
The grinder is already set on bar-type grinding.
7 – GRINDING REGULATION
To change the grinding regulation, turn the bell jar (2) clockwise to bring
the grinders closer and obtain a finer grinding, or anticlockwise to distance
them and obtain a coarser grinding; please refer to the regulation selector
scale (3) that you will find on the base of the bell jar.
8 – COFFEE DOSING
Ground coffee will deposit inside the container (5).
To fill the filter basket placed in the coffee machine filter-holder, follow the
steps outlined below:
8.1 – JOLLY MODEL
Remove the lid (4) of the ground coffee container (5) and, with the aid of
the measuring spoon provided, take the amount of coffee powder required
to prepare the espresso coffee.


Find Your Products By Category
Please Login
